for WPF developers
tips - ユーザコントロールを利用する
簡単なコントロールの組み合わせだけど何度も使い回したい場合、 ユーザコントロールを定義することによって再利用できるコントロールの組み合わせを作ることができます。
ページ内リンク
ユーザコントロールの作り方
ユーザコントロールを作るときは、ソリューションエクスプローラで右クリックし、
「追加」→「ユーザーコントロール」をクリックします。
"新しい項目の追加" というダイアログが開くので、
ユーザコントロールの名前を決めて「追加」ボタンを押します。
すると、下記のようなコードを持った UserControl の XAML エディタが開きます。
<UserControl x:Class="UserControlSamle.Views.SampleUserControl"
             xmlns="http://schemas.microsoft.com/winfx/2006/xaml/presentation"
             xmlns:x="http://schemas.microsoft.com/winfx/2006/xaml"
             xmlns:mc="http://schemas.openxmlformats.org/markup-compatibility/2006"
             xmlns:d="http://schemas.microsoft.com/expression/blend/2008"
             mc:Ignorable="d"
             d:DesignHeight="300" d:DesignWidth="300">
    <Grid>

    </Grid>
</UserControl>
例えばこれを次のように書き換えます。
<UserControl x:Class="UserControlSamle.Views.SampleUserControl"
             xmlns="http://schemas.microsoft.com/winfx/2006/xaml/presentation"
             xmlns:x="http://schemas.microsoft.com/winfx/2006/xaml"
             xmlns:mc="http://schemas.openxmlformats.org/markup-compatibility/2006"
             xmlns:d="http://schemas.microsoft.com/expression/blend/2008"
             mc:Ignorable="d"
             d:DesignHeight="300" d:DesignWidth="300">
    <StackPanel Orientation="Horizontal">
        <Ellipse Fill="Lime" Width="32" Height="32" Margin="5" />
        <Ellipse Fill="Yellow" Width="32" Height="32" Margin="5" />
        <Ellipse Fill="Red" Width="32" Height="32" Margin="5" />
    </StackPanel>
</UserControl>
ユーザコントロールの使い方
上記で作成したユーザコントロールを実際のウィンドウ上に配置してみましょう。
配置する前に、ユーザコントロールが登録されている名前空間のエイリアスを定義する必要があります。
ここではソリューションエクスプローラの Views フォルダにユーザコントロールを追加したため、
その名前空間は自動的に ***.Views となっています。
したがって、次のようにエイリアス local として定義します。
<Window x:Class="UserControlSamle.Views.MainView"
        xmlns="http://schemas.microsoft.com/winfx/2006/xaml/presentation"
        xmlns:x="http://schemas.microsoft.com/winfx/2006/xaml"
        xmlns:local="clr-namespace:UserControlSamle.Views"
        Title="MainView" Height="300" Width="300">
    <Grid>

    </Grid>
</Window>
このように定義することで、Views 名前空間にあるクラスを XAML 上で宣言することができます。
次のように記述することで、定義した SampleUserControl クラスを配置できます。
<Grid>
    <local:SampleUserControl />
</Grid>

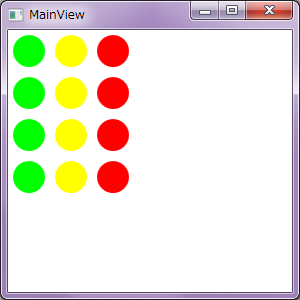
もちろん複数のインスタンスを配置することもできます。
<Window x:Class="UserControlSamle.Views.MainView"
        xmlns="http://schemas.microsoft.com/winfx/2006/xaml/presentation"
        xmlns:x="http://schemas.microsoft.com/winfx/2006/xaml"
        xmlns:local="clr-namespace:UserControlSamle.Views"
        Title="MainView" Height="300" Width="300">
    <StackPanel>
        <local:SampleUserControl />
        <local:SampleUserControl />
        <local:SampleUserControl />
        <local:SampleUserControl />
    </StackPanel>
</Window>
Designed by CSS.Design Sample