ListBox などのアイテムをドラッグ&ドロップ操作で並べ替える
二番煎じもいいところのお題ではありますが、実はこの手の情報を検索すると、そのほとんどが View 側でコレクションを並べ替えるものです。
コレクションを提供しているのは ViewModel 側で、その並び順を制御するのも ViewModel 側の責務だと私は思っていたので、これといった良いサンプルコードに出会うことができませんでした。
というわけでいつも通り、無い物は自作すればいいじゃない、の精神でやってみます。
意図したサンプルコードは見当たりませんでしたが、周辺コードはとても参考になりました。
例えば ItemsControl に並べられているアイテムをクリックしたときなど、イベント引数の OriginalSource プロパティを利用することでどのアイテムが対象であるかを知ることができます。
また、ItemsControl.ItemContainerGenerator プロパティを使用することで、対象とするコンテナが何番目のものなのか知ることができます。
以上の方法を使うことで、次のような流れでドラッグ&ドロップ操作の結果を ViewModel 側に伝えます。
- MouseLeftButtonDown イベントで対象のアイテムを確定
- MouseMove イベントでドラッグ開始判定
- Drop イベントでドロップ先のインデックス番号をコールバックする
View と ViewModel を準備
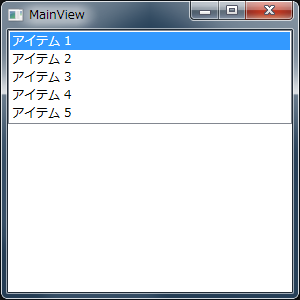
まずどのような UI を使用するかを紹介します。
<Window x:Class="Tips_ReorderedListBox.Views.MainView"
xmlns="http://schemas.microsoft.com/winfx/2006/xaml/presentation"
xmlns:x="http://schemas.microsoft.com/winfx/2006/xaml"
Title="MainView" Height="300" Width="300">
<StackPanel>
<ListBox ItemsSource="{Binding Items}" SelectedIndex="{Binding CurrentIndex}" />
</StackPanel>
</Window>
namespace Tips_ReorderedListBox.ViewModels
{using System.Collections.ObjectModel;
using System.ComponentModel;
using System.Runtime.CompilerServices;
internal class MainViewModel : INotifyPropertyChanged
{private ObservableCollection<string> _items = new ObservableCollection<string>()
{"アイテム 1","アイテム 2","アイテム 3","アイテム 4","アイテム 5",};
public ObservableCollection<string> Items { get { return this._items; } }
private int _currentIndex;
public int CurrentIndex
{get { return this._currentIndex; }
set { SetProperty(ref this._currentIndex, value); }
}
#region INotifyPropertyChanged のメンバpublic event PropertyChangedEventHandler PropertyChanged;
private void RaisePropertyChanged([CallerMemberName]string propertyName = null)
{var h = this.PropertyChanged;
if (h != null) h(this, new PropertyChangedEventArgs(propertyName));
}
private bool SetProperty<T>(ref T target, T value, [CallerMemberName]string propertyName = null)
{if (Equals(target, value)) return false;
target = value;RaisePropertyChanged(propertyName);
return true;
}
#endregion INotifyPropertyChanged のメンバ}
}
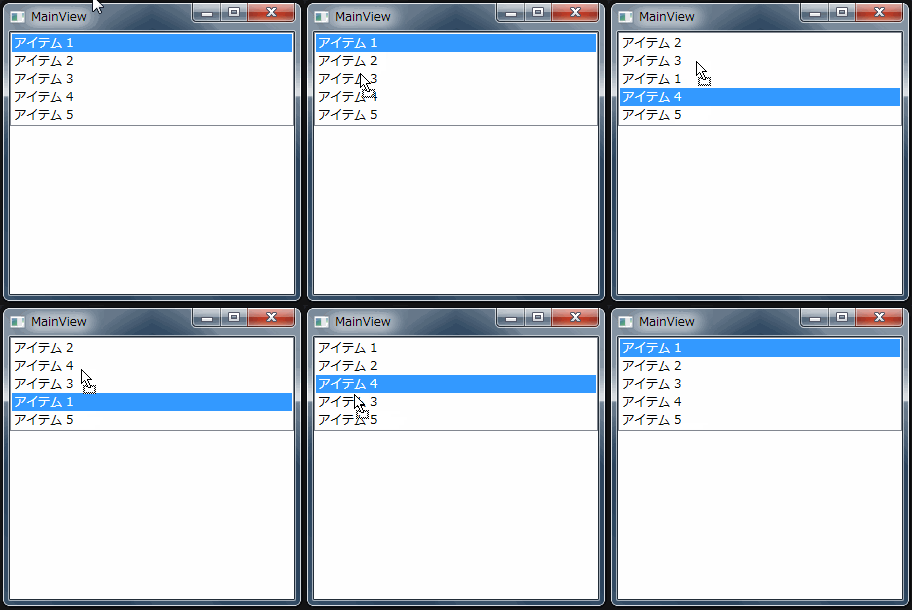
「アイテム 1」や「アイテム 2」をドラッグ&ドロップで並べ替えられるようにすることが目的です。
ReorderableItemsControlBehavior クラスを作成する
それでは本題に入ります。ドラッグ&ドロップに関するコードをビヘイビアに詰め込むために、ReorderableItemsControlBehavior というクラスを新規作成します。
namespace Tips_ReorderedListBox.Views.Behaviors
{using System;using System.Windows;
using System.Windows.Controls;
using System.Windows.Input;
/// <summary>
/// ItemsControl に対するドラッグ&ドロップによる並べ替え動作をおこなうビヘイビアを表します。
/// </summary>
internal class ReorderableItemsControlBehavior
{#region Callback 添付プロパティ/// <summary>
/// Callback 添付プロパティの定義
/// </summary>
public static readonly DependencyProperty CallbackProperty = DependencyProperty.RegisterAttached("Callback", typeof(Action<int>), typeof(ReorderableItemsControlBehavior), new PropertyMetadata(null, OnCallbackPropertyChanged));
/// <summary>
/// Callback 添付プロパティを取得します。
/// </summary>
/// <param name="target">対象とする DependencyObject を指定します。</param>
/// <returns>取得した値を返します。</returns>
public static Action<int> GetCallback(DependencyObject target)
{return (Action<int>)target.GetValue(CallbackProperty);
}
/// <summary>
/// Callback 添付プロパティを設定します。
/// </summary>
/// <param name="target">対象とする DependencyObject を指定します。</param>
/// <param name="value">設定する値を指定します。</param>
public static void SetCallback(DependencyObject target, Action<int> value)
{target.SetValue(CallbackProperty, value);}
/// <summary>
/// Callback 添付プロパティ変更イベントハンドラ
/// </summary>
/// <param name="d">イベント発行元</param>
/// <param name="e">イベント引数</param>
private static void OnCallbackPropertyChanged(DependencyObject d, DependencyPropertyChangedEventArgs e)
{var itemsControl = d as ItemsControl;
if (itemsControl == null) return;
if (GetCallback(itemsControl) != null)
{itemsControl.PreviewMouseLeftButtonDown += OnPreviewMouseLeftButtonDown;
itemsControl.PreviewMouseMove += OnPreviewMouseMove;
itemsControl.PreviewMouseLeftButtonUp += OnPreviewMouseLeftButtonUp;
itemsControl.PreviewDragEnter += OnPreviewDragEnter;
itemsControl.PreviewDragLeave += OnPreviewDragLeave;
itemsControl.PreviewDrop += OnPreviewDrop;
}
else{itemsControl.PreviewMouseLeftButtonDown -= OnPreviewMouseLeftButtonDown;
itemsControl.PreviewMouseMove -= OnPreviewMouseMove;
itemsControl.PreviewMouseLeftButtonUp -= OnPreviewMouseLeftButtonUp;
itemsControl.PreviewDragEnter -= OnPreviewDragEnter;
itemsControl.PreviewDragLeave -= OnPreviewDragLeave;
itemsControl.PreviewDrop -= OnPreviewDrop;
}
}
#endregion Callback 添付プロパティ#region イベントハンドラ/// <summary>
/// PreviewMouseLeftButtonDown イベントハンドラ
/// </summary>
/// <param name="sender">イベント発行元</param>
/// <param name="e">イベント引数</param>
private static void OnPreviewMouseLeftButtonDown(object sender, MouseButtonEventArgs e)
{throw new NotImplementedException();
}
/// <summary>
/// PreviewMouseMove イベントハンドラ
/// </summary>
/// <param name="sender">イベント発行元</param>
/// <param name="e">イベント引数</param>
private static void OnPreviewMouseMove(object sender, MouseEventArgs e)
{throw new NotImplementedException();
}
/// <summary>
/// PreviewMouseLeftButtonUp イベントハンドラ
/// </summary>
/// <param name="sender">イベント発行元</param>
/// <param name="e">イベント引数</param>
private static void OnPreviewMouseLeftButtonUp(object sender, MouseButtonEventArgs e)
{throw new NotImplementedException();
}
/// <summary>
/// PreviewDragEnter イベントハンドラ
/// </summary>
/// <param name="sender">イベント発行元</param>
/// <param name="e">イベント引数</param>
private static void OnPreviewDragEnter(object sender, DragEventArgs e)
{throw new NotImplementedException();
}
/// <summary>
/// PreviewDragLeave イベントハンドラ
/// </summary>
/// <param name="sender">イベント発行元</param>
/// <param name="e">イベント引数</param>
private static void OnPreviewDragLeave(object sender, DragEventArgs e)
{throw new NotImplementedException();
}
/// <summary>
/// PreviewDrop イベントハンドラ
/// </summary>
/// <param name="sender">イベント発行元</param>
/// <param name="e">イベント引数</param>
private static void OnPreviewDrop(object sender, DragEventArgs e)
{throw new NotImplementedException();
}
#endregion イベントハンドラ}
}
このビヘイビアでは最終的にコールバックで ViewModel 側に操作結果を伝えることが目的なので、安直に Callback 添付プロパティをあらかじめ定義しておきます。ドラッグ&ドロップ操作によって移動先のインデックス番号がわかればいいので、Action<int> 型としています。
また、このビヘイビアは ItemsControl 派生のコントロールクラスを想定しているため、Callback 添付プロパティが設定されたときに ItemsControl クラスとして各種マウスイベントに対するイベントハンドラを登録します。ここではまだスタブを定義しているだけで、実際の実装内容はこれから順番に説明します。
ドラッグ中の一時データ
各イベントハンドラの実装の前に、ドラッグ中の一時データを保持するためのクラスをひとつだけ用意します。
/// <summary>
/// ドラッグ中の一時データ
/// </summary>
private static DragDropObject temporaryData;
/// <summary>
/// ドラッグ&ドロップに関するデータを表します。
/// </summary>
private class DragDropObject
{/// <summary>
/// ドラッグ開始座標を取得または設定します。
/// </summary>
public Point Start { get; set; }
/// <summary>
/// ドラッグ対象であるオブジェクトを取得または設定します。
/// </summary>
public FrameworkElement DraggedItem { get; set; }
/// <summary>
/// ドロップ可能かどうかを取得または設定します。
/// </summary>
public bool IsDroppable { get; set; }
/// <summary>
/// ドラッグを開始していいかどうかを確認します。
/// </summary>
/// <param name="current">現在のマウス座標を指定します。</param>
/// <returns>十分マウスが移動している場合に true を返します。</returns>
public bool CheckStartDragging(Point current)
{return (current - this.Start).Length - MinimumDragPoint.Length > 0;
}
/// <summary>
/// ドラッグ開始に必要な最短距離を示すベクトル
/// </summary>
private static readonly Vector MinimumDragPoint = new Vector(SystemParameters.MinimumHorizontalDragDistance, SystemParameters.MinimumVerticalDragDistance);
}
PreviewMouseLeftButtonDown イベントハンドラ
ドラッグ&ドロップ操作の入り口となるマウスボタンを押したときのイベントハンドラを次のように実装します。
/// <summary>
/// PreviewMouseLeftButtonDown イベントハンドラ
/// </summary>
/// <param name="sender">イベント発行元</param>
/// <param name="e">イベント引数</param>
private static void OnPreviewMouseLeftButtonDown(object sender, MouseButtonEventArgs e)
{var control = sender as FrameworkElement;
temporaryData = new DragDropObject();
temporaryData.Start = e.GetPosition(Window.GetWindow(control));
temporaryData.DraggedItem = GetTemplatedRootElement(e.OriginalSource as FrameworkElement);
}
GetTemplatedRootElement() メソッドでは、与えられた要素の TemplatedParent をたどって得られるルート要素を取得するためのヘルパメソッドで、次のように実装しています。
/// <summary>
/// 指定された FrameworkElement に対するテンプレートのルート要素を取得します。
/// </summary>
/// <param name="element">FrameworkElement を指定します。</param>
/// <returns>TemplatedParent を辿った先のルート要素を返します。</returns>
private static FrameworkElement GetTemplatedRootElement(FrameworkElement element)
{var parent = element.TemplatedParent as FrameworkElement;
while (parent.TemplatedParent != null)
{parent = parent.TemplatedParent as FrameworkElement;
}
return parent;}
e.GetPosition() メソッドでマウスの相対位置取得できます。ここでは Window.GetWindow() メソッドを利用することで、アプリケーションのウィンドウを基準とした相対位置を取得し、ドラッグの開始位置を保持しています。
e.OriginalSource はイベント発行元の要素なので、これを利用してドラッグするオブジェクトを保持します。ただし、e.OriginalSource から得られる要素は例えば Border コントロールだったり TextBlock コントロールだったりと、ItemsControl の各子要素を構成するコントロールの一部になります。ここでは、そこから得られる子要素のコンテナ自体を取得したいため、TemplatedParent プロパティをたどってコンテナ要素を探索しています。こうすることで、今回のように ListBox コントロールを対象とする場合はこのメソッドで ListBoxItem コントロールが得られます。
PreviewMouseMove イベントハンドラ
PreviewMouseLeftButtonDown イベントハンドラでドラッグ対象のオブジェクトを掴んだら、次はマウスを動かすときの挙動を処理します。
/// <summary>
/// PreviewMouseMove イベントハンドラ
/// </summary>
/// <param name="sender">イベント発行元</param>
/// <param name="e">イベント引数</param>
private static void OnPreviewMouseMove(object sender, MouseEventArgs e)
{if (temporaryData != null)
{var control = sender as FrameworkElement;
var current = e.GetPosition(Window.GetWindow(control));
if (temporaryData.CheckStartDragging(current))
{DragDrop.DoDragDrop(control, temporaryData.DraggedItem, DragDropEffects.Move);
// この先は Drop イベント処理後におこなわれるtemporaryData = null;
}
}
}
PreviewMouseMove イベントは、マウスがこのコントロール上を通過するだけで発生してしまうため、ドラッグせずにただマウスが通過してもこのイベントハンドラが処理されてしまいます。このため、temporaryData オブジェクトが null かどうかを判定することで、事前に PreviewMouseLeftButtonDown イベントハンドラが処理されたかどうかを判別しています。
CheckStartDragging() メソッドで十分な距離を移動したとき、DragDrop.DoDragDrop() メソッドを呼び出していよいよドラッグ操作を開始します。このメソッドを呼び出すと、ここの処理をいったん抜け出し、以降の処理は Drop イベントが発生した後に実行されることになります。Drop イベント発生後は、temporaryData が不要になるので、null を入れてオブジェクトを破棄します。
PreviewMouseLeftButtonUp イベントハンドラ
マウスボタンを押したものの、動かさずにそのままボタンを離した場合、特に処理をせずに終了させます。
/// <summary>
/// PreviewMouseLeftButtonUp イベントハンドラ
/// </summary>
/// <param name="sender">イベント発行元</param>
/// <param name="e">イベント引数</param>
private static void OnPreviewMouseLeftButtonUp(object sender, MouseButtonEventArgs e)
{temporaryData = null;
}
PreviewDragEnter イベントハンドラ
DragDrop.DoDragDrop() メソッドがコールされた後は、ドラッグ&ドロップ系のイベントが発生するようになります。DragEnter イベントは対象となるコントロールの外側から内側に入り込むときに一度だけ発生します。
/// <summary>
/// PreviewDragEnter イベントハンドラ
/// </summary>
/// <param name="sender">イベント発行元</param>
/// <param name="e">イベント引数</param>
private static void OnPreviewDragEnter(object sender, DragEventArgs e)
{temporaryData.IsDroppable = true;
}
コントロールの外側でドロップされたときに「何も処理しない」という処理をするため、IsDroppable プロパティを制御しています。
PreviewDragLeave イベントハンドラ
DragLeave イベントは対象となるコントロールの内側から外側に出るときに一度だけ発生します。コントロールの内側でドロップされたときに本題の処理をおこなうため、IsDroppable プロパティを制御しています。
/// <summary>
/// PreviewDragLeave イベントハンドラ
/// </summary>
/// <param name="sender">イベント発行元</param>
/// <param name="e">イベント引数</param>
private static void OnPreviewDragLeave(object sender, DragEventArgs e)
{temporaryData.IsDroppable = false;
}
PreviewDrop イベントハンドラ
ようやく本題の処理の部分です。ドロップされたときにそのドロップ位置を ViewModel 側にコールバックする処理を実装しています。
/// <summary>
/// PreviewDrop イベントハンドラ
/// </summary>
/// <param name="sender">イベント発行元</param>
/// <param name="e">イベント引数</param>
private static void OnPreviewDrop(object sender, DragEventArgs e)
{if (temporaryData.IsDroppable)
{var itemsControl = sender as ItemsControl;
// 異なる ItemsControl 間でドロップ処理されないようにするために// 同一 ItemsControl 内にドラッグされたコンテナが存在することを確認するif (itemsControl.ItemContainerGenerator.IndexFromContainer(temporaryData.DraggedItem) >= 0)
{var targetContainer = GetTemplatedRootElement(e.OriginalSource as FrameworkElement);
var index = itemsControl.ItemContainerGenerator.IndexFromContainer(targetContainer);
if (index >= 0)
{var callback = GetCallback(itemsControl);
callback(index);
}
}
}
// 終了後は DragDrop.DoDragDrop() メソッド呼び出し元へ戻る}
やりたかったことは、16 行目と 20 行目の 2 行だけです。
16 行目でドロップされたアイテムのインデックス番号を取得しています。そして、20 行目で ViewModel 側から指定されるであろうコールバックメソッドのデリゲートを呼び出しています。
その他に、変なところでドロップされたとき、index が -1 となることがあるため、ここではそのような場合は何もしないようにしています。場合によってはそんなときは必ず最後尾のインデックス番号を返すようにして見てもいいかもしれません。
また、異なる ItemsControl のコントロールが複数あって、そのどれもがこのビヘイビアを実装した場合、隣の ItemsControl のアイテムがドラッグされても同様の処理が実行されてしまわないように、同一のコントロール内だけで処理がおこなわれるように 13 行目の判定を追加しています。ドラッグしたコンテナを含んでいるかどうかを探索することでドラッグ元の ItemsControl とドロップ先の ItemsControl が同一のコントロールであるかどうかを判定しています。
使ってみよう
それでは実際に使ってみます。MainView.xaml と MainViewModel.cs を次のように変更します。
<Window x:Class="Tips_ReorderedListBox.Views.MainView"
xmlns="http://schemas.microsoft.com/winfx/2006/xaml/presentation"
xmlns:x="http://schemas.microsoft.com/winfx/2006/xaml"
xmlns:b="clr-namespace:Tips_ReorderedListBox.Views.Behaviors"
Title="MainView" Height="300" Width="300">
<StackPanel>
<ListBox ItemsSource="{Binding Items}" SelectedIndex="{Binding CurrentIndex}" b:ReorderableItemsControlBehavior.Callback="{Binding DropCallback}" AllowDrop="True" />
</StackPanel>
</Window>
namespace Tips_ReorderedListBox.ViewModels
{using System;using System.Collections.ObjectModel;
using System.ComponentModel;
using System.Runtime.CompilerServices;
internal class MainViewModel : INotifyPropertyChanged
{private ObservableCollection<string> _items = new ObservableCollection<string>()
{"アイテム 1","アイテム 2","アイテム 3","アイテム 4","アイテム 5",};
public ObservableCollection<string> Items { get { return this._items; } }
private int _currentIndex;
public int CurrentIndex
{get { return this._currentIndex; }
set { SetProperty(ref this._currentIndex, value); }
}
public Action<int> DropCallback { get { return OnDrop; } }
private void OnDrop(int index)
{if (index >= 0)
{this.Items.Move(this.CurrentIndex, index);
}
}
#region INotifyPropertyChanged のメンバpublic event PropertyChangedEventHandler PropertyChanged;
private void RaisePropertyChanged([CallerMemberName]string propertyName = null)
{var h = this.PropertyChanged;
if (h != null) h(this, new PropertyChangedEventArgs(propertyName));
}
private bool SetProperty<T>(ref T target, T value, [CallerMemberName]string propertyName = null)
{if (Equals(target, value)) return false;
target = value;RaisePropertyChanged(propertyName);
return true;
}
#endregion INotifyPropertyChanged のメンバ}
}
View からはあくまでもドロップ先のインデックス番号が通知されるだけで、ViewModel 側は現在のインデックス番号と通知されたインデックス番号を使って自分が持っているコレクションを操作しています。
おまけ
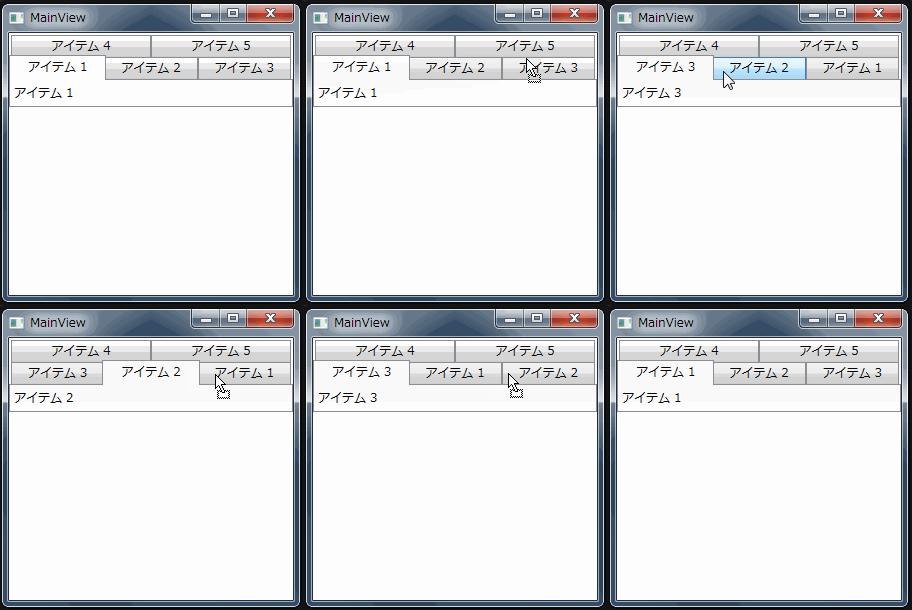
このビヘイビアの旨味は TabControl に対しても使えるところ。MainView.xaml だけを次のように変更しても使えます。
<Window x:Class="Tips_ReorderedListBox.Views.MainView"
xmlns="http://schemas.microsoft.com/winfx/2006/xaml/presentation"
xmlns:x="http://schemas.microsoft.com/winfx/2006/xaml"
xmlns:b="clr-namespace:Tips_ReorderedListBox.Views.Behaviors"
Title="MainView" Height="300" Width="300">
<StackPanel>
<TabControl ItemsSource="{Binding Items}" SelectedIndex="{Binding CurrentIndex}" b:ReorderableItemsControlBehavior.Callback="{Binding DropCallback}" AllowDrop="True" />
</StackPanel>
</Window>
ListBox を TabControl に変更しただけです。
実行結果。ちゃんとドラッグ&ドロップで並べ替えられています。
Tweet
スタイルシート更新しました
せっかく自分のブログを立ち上げたので、しょぼいなりにアクセス解析なんぞ設置しています。たまにアクセス数が増えたときなんかはちょこっとニヤリとしています。
それで最近気付いたんですが、意外とモバイルからこのサイトを閲覧している方がいらっしゃるんですね。特に XAML のコードなんかは横長になる傾向があるのでみにくいんじゃないかなーとも思いますが、それ以前に、そういえばスマホ用のスタイルシートが立ち上げ当初から放置状態でちょっとあんまりな感じでした。
というわけでスタイルシートを見直して、とりあえずメインで使用しているスタイルシートに合わせてきちんと表示されるように更新しました。
アクセス数は大したことのないこじんまりとしたブログですが、見てくれる数少ない人が快適に見られるように頑張りますので、なにかありましたら Twitter なんぞで連絡ください。前向きに努力します。
(下手にレスポンシブデザインなんかにしないほうがいいのかな…。)
Tweet
WPF で画面遷移する方法 4
前回は TabControl によって画面遷移をおこないましたが、遷移アニメーションがなくてさみしくなってしまいました。ここでは TabControl によってアニメーションしながら画面遷移するようにします。
わざわざ記事を分けてしまいましたが、実は結構簡単。一番最初に紹介した TransitionPanel コントロールを使います。もう忘れてしまっていると思うのでコードを再掲します。
<UserControl x:Class="TabSample.Views.TransitionPanel"
xmlns="http://schemas.microsoft.com/winfx/2006/xaml/presentation"
xmlns:x="http://schemas.microsoft.com/winfx/2006/xaml"
xmlns:mc="http://schemas.openxmlformats.org/markup-compatibility/2006"
xmlns:d="http://schemas.microsoft.com/expression/blend/2008"
mc:Ignorable="d"
d:DesignWidth="400" d:DesignHeight="600"
x:Name="root">
<Grid>
<ContentControl Content="{Binding ContentA, ElementName=root}">
<ContentControl.RenderTransform>
<TranslateTransform X="{Binding OffsetXA, ElementName=root}" Y="{Binding OffsetYA, ElementName=root}" />
</ContentControl.RenderTransform>
</ContentControl>
<ContentControl Content="{Binding ContentB, ElementName=root}">
<ContentControl.RenderTransform>
<TranslateTransform X="{Binding OffsetXB, ElementName=root}" Y="{Binding OffsetYB, ElementName=root}" />
</ContentControl.RenderTransform>
</ContentControl>
</Grid>
</UserControl>
namespace TabSample.Views
{using System;using System.Windows;
using System.Windows.Controls;
using System.Windows.Media.Animation;
/// <summary>
/// TransitionPanel.xaml の相互作用ロジック
/// </summary>
public partial class TransitionPanel : UserControl
{/// <summary>
/// 新しいインスタンスを生成します。
/// </summary>
public TransitionPanel(){InitializeComponent();
this.Loaded += OnLoaded;
}
/// <summary>
/// アニメーションの方向を表します。
/// </summary>
public enum TransitDirections
{/// <summary>
/// 左へ移動します。
/// </summary>
ToLeft,
/// <summary>
/// 右へ移動します。
/// </summary>
ToRight,
}
/// <summary>
/// 遷移状態を表します。
/// </summary>
public enum TransitionStates
{/// <summary>
/// A が表示されている状態を表します。
/// </summary>
DisplayA,
/// <summary>
/// B が表示されている状態を表します。
/// </summary>
DisplayB,
}
#region Content 依存関係プロパティ/// <summary>
/// Content 依存関係プロパティを定義し直します。
/// </summary>
public static readonly new DependencyProperty ContentProperty = DependencyProperty.Register("Content", typeof(object), typeof(TransitionPanel), new UIPropertyMetadata(null, OnConentPropertyChanged));
/// <summary>
/// コンテンツを取得または設定します。
/// </summary>
public new object Content
{get { return GetValue(ContentProperty); }
set { SetValue(ContentProperty, value); }
}
#endregion Content 依存関係プロパティ#region ContentA 依存関係プロパティ/// <summary>
/// ContentA 依存関係プロパティのキーを定義します。
/// </summary>
private static readonly DependencyPropertyKey ContentAPropertyKey = DependencyProperty.RegisterReadOnly("ContentA", typeof(object), typeof(TransitionPanel), new UIPropertyMetadata(null));
/// <summary>
/// ContentA 依存関係プロパティを定義します。
/// </summary>
public static readonly DependencyProperty ContentAProperty = ContentAPropertyKey.DependencyProperty;
/// <summary>
/// コンテンツのためのバッファ A を取得します。
/// </summary>
public object ContentA
{get { return GetValue(ContentAProperty); }
private set { SetValue(ContentAPropertyKey, value); }
}
#endregion ContentA 依存関係プロパティ#region ContentB 依存関係プロパティ/// <summary>
/// ContentB 依存関係プロパティのキーを定義します。
/// </summary>
private static readonly DependencyPropertyKey ContentBPropertyKey = DependencyProperty.RegisterReadOnly("ContentB", typeof(object), typeof(TransitionPanel), new UIPropertyMetadata(null));
/// <summary>
/// ContentB 依存関係プロパティを定義します。
/// </summary>
public static readonly DependencyProperty ContentBProperty = ContentBPropertyKey.DependencyProperty;
/// <summary>
/// コンテンツのためのバッファ B を取得します。
/// </summary>
public object ContentB
{get { return GetValue(ContentBProperty); }
private set { SetValue(ContentBPropertyKey, value); }
}
#endregion ContentB 依存関係プロパティ#region State 依存関係プロパティ/// <summary>
/// State 依存関係プロパティのキーを定義します。
/// </summary>
private static readonly DependencyPropertyKey StatePropertyKey = DependencyProperty.RegisterReadOnly("State", typeof(TransitionStates), typeof(TransitionPanel), new UIPropertyMetadata(TransitionStates.DisplayB));
/// <summary>
/// State 依存関係プロパティを定義します。
/// </summary>
public static readonly DependencyProperty StateProperty = StatePropertyKey.DependencyProperty;
/// <summary>
/// 遷移状態を取得します。
/// </summary>
public TransitionStates State
{get { return (TransitionStates)GetValue(StateProperty); }
private set { SetValue(StatePropertyKey, value); }
}
#endregion State 依存関係プロパティ#region TransitDirection 依存関係プロパティ/// <summary>
/// TransitDirection 依存関係プロパティを定義します。
/// </summary>
public static readonly DependencyProperty TransitDirectionProperty = DependencyProperty.Register("TransitDirection", typeof(TransitDirections), typeof(TransitionPanel), new UIPropertyMetadata(TransitDirections.ToLeft));
/// <summary>
/// 画面遷移方向を取得または設定します。
/// </summary>
public TransitDirections TransitDirection
{get { return (TransitDirections)GetValue(TransitDirectionProperty); }
set { SetValue(TransitDirectionProperty, value); }
}
#endregion TransitDirection 依存関係プロパティ#region OffsetXA 依存関係プロパティ/// <summary>
/// OffsetXA 依存関係プロパティを定義します。
/// </summary>
public static readonly DependencyProperty OffsetXAProperty = DependencyProperty.Register("OffsetXA", typeof(double), typeof(TransitionPanel), new UIPropertyMetadata(0.0));
/// <summary>
/// コンテンツのためのバッファ A の水平方向オフセットを取得または設定します。
/// </summary>
public double OffsetXA
{get { return (double)GetValue(OffsetXAProperty); }
set { SetValue(OffsetXAProperty, value); }
}
#endregion OffsetXA 依存関係プロパティ#region OffsetYA 依存関係プロパティ/// <summary>
/// OffsetYA 依存関係プロパティを定義します。
/// </summary>
public static readonly DependencyProperty OffsetYAProperty = DependencyProperty.Register("OffsetYA", typeof(double), typeof(TransitionPanel), new UIPropertyMetadata(0.0));
/// <summary>
/// コンテンツのためのバッファ A の垂直方向オフセットを取得または設定します。
/// </summary>
public double OffsetYA
{get { return (double)GetValue(OffsetYAProperty); }
set { SetValue(OffsetYAProperty, value); }
}
#endregion OffsetYA 依存関係プロパティ#region OffsetXB 依存関係プロパティ/// <summary>
/// OffsetXB 依存関係プロパティを定義します。
/// </summary>
public static readonly DependencyProperty OffsetXBProperty = DependencyProperty.Register("OffsetXB", typeof(double), typeof(TransitionPanel), new UIPropertyMetadata(0.0));
/// <summary>
/// コンテンツのためのバッファ B の水平方向オフセットを取得または設定します。
/// </summary>
public double OffsetXB
{get { return (double)GetValue(OffsetXBProperty); }
set { SetValue(OffsetXBProperty, value); }
}
#endregion OffsetXB 依存関係プロパティ#region OffsetYB 依存関係プロパティ/// <summary>
/// OffsetYB 依存関係プロパティを定義します。
/// </summary>
public static readonly DependencyProperty OffsetYBProperty = DependencyProperty.Register("OffsetYB", typeof(double), typeof(TransitionPanel), new UIPropertyMetadata(0.0));
/// <summary>
/// コンテンツのためのバッファ B の垂直方向オフセットを取得または設定します。
/// </summary>
public double OffsetYB
{get { return (double)GetValue(OffsetYBProperty); }
set { SetValue(OffsetYBProperty, value); }
}
#endregion OffsetYB 依存関係プロパティ#region イベントハンドラ/// <summary>
/// Load イベントハンドラ
/// </summary>
/// <param name="sender">イベント発行元</param>
/// <param name="e">イベント引数</param>
private void OnLoaded(object sender, RoutedEventArgs e)
{var storyboard = new Storyboard();
storyboard.Children = new TimelineCollection()
{CreateMoveAnimation(TimeZero, TimeZero, this.HorizontalOffset, "OffsetXB"),
};
storyboard.Begin();}
/// <summary>
/// Content 依存関係プロパティ変更イベントハンドラ
/// </summary>
/// <param name="d">イベント発行元</param>
/// <param name="e">イベント引数</param>
private static void OnConentPropertyChanged(DependencyObject d, DependencyPropertyChangedEventArgs e)
{var control = d as TransitionPanel;
if (control.IsInitialized) control.SwapDisplay();
}
#endregion イベントハンドラ#region ヘルパ/// <summary>
/// コンテンツを入れ替えます。
/// </summary>
private void SwapDisplay()
{if (this.State == TransitionStates.DisplayA)
{this.ContentB = this.Content;
this.State = TransitionStates.DisplayB;
}
else{this.ContentA = this.Content;
this.State = TransitionStates.DisplayA;
}
if ((this.ContentA != null) && (this.ContentB != null))
StartAnimation();
}
/// <summary>
/// 画面遷移を開始します。
/// </summary>
private void StartAnimation()
{var storyboard = this.State == TransitionStates.DisplayA ? CreateAnimationBtoA(this.TransitDirection) : CreateAnimationAtoB(this.TransitDirection);
storyboard.Begin();}
/// <summary>
/// ContentB から ContentA へ遷移するためのストーリーボードを生成します。
/// </summary>
/// <param name="direction">遷移する方向を指定します。</param>
/// <returns>生成したストーリーボードを返します。</returns>
private Storyboard CreateAnimationBtoA(TransitDirections direction)
{var storyboard = new Storyboard();
storyboard.Children = direction == TransitDirections.ToLeft ?
new TimelineCollection()
{CreateMoveAnimation(TimeZero, TimeZero, this.HorizontalOffset, "OffsetXA"),
CreateMoveAnimation(TimeZero, AnimationTime, 0, "OffsetXA"),
CreateMoveAnimation(TimeZero, AnimationTime, -this.HorizontalOffset, "OffsetXB"),
} :
new TimelineCollection()
{CreateMoveAnimation(TimeZero, TimeZero, -this.HorizontalOffset, "OffsetXA"),
CreateMoveAnimation(TimeZero, AnimationTime, 0, "OffsetXA"),
CreateMoveAnimation(TimeZero, AnimationTime, this.HorizontalOffset, "OffsetXB"),
};
return storyboard;}
/// <summary>
/// ContentA から ContentB へ遷移するためのストーリーボードを生成します。
/// </summary>
/// <param name="direction">遷移する方向を指定します。</param>
/// <returns>生成したストーリーボードを返します。</returns>
private Storyboard CreateAnimationAtoB(TransitDirections direction)
{var storyboard = new Storyboard();
storyboard.Children = direction == TransitDirections.ToLeft ?
new TimelineCollection()
{CreateMoveAnimation(TimeZero, TimeZero, this.HorizontalOffset, "OffsetXB"),
CreateMoveAnimation(TimeZero, AnimationTime, 0, "OffsetXB"),
CreateMoveAnimation(TimeZero, AnimationTime, -this.HorizontalOffset, "OffsetXA"),
} :
new TimelineCollection()
{CreateMoveAnimation(TimeZero, TimeZero, -this.HorizontalOffset, "OffsetXB"),
CreateMoveAnimation(TimeZero, AnimationTime, 0, "OffsetXB"),
CreateMoveAnimation(TimeZero, AnimationTime, this.HorizontalOffset, "OffsetXA"),
};
return storyboard;}
/// <summary>
/// Double 型のプロパティに対するアニメーションを生成します。
/// </summary>
/// <param name="beginTime">アニメーションの開始時間を指定します。</param>
/// <param name="duration">アニメーションの実行時間を指定します。</param>
/// <param name="to">プロパティ値の最終値を指定します。</param>
/// <param name="targetPropertyName">対象とするプロパティ名を指定します。</param>
/// <returns>Storyboard の添付プロパティを設定したアニメーションを返します。</returns>
private DoubleAnimation CreateMoveAnimation(TimeSpan beginTime, TimeSpan duration, double to, string targetPropertyName)
{var animation = new DoubleAnimation()
{To = to,BeginTime = beginTime,Duration = new Duration(duration),
AccelerationRatio = 0.3,
DecelerationRatio = 0.3,
};
Storyboard.SetTarget(animation, this);
Storyboard.SetTargetProperty(animation, new PropertyPath(targetPropertyName));
return animation;}
#endregion ヘルパ#region private フィールド/// <summary>
/// 時刻ゼロ
/// </summary>
private static readonly TimeSpan TimeZero = TimeSpan.FromMilliseconds(0);
/// <summary>
/// アニメーション時間
/// </summary>
private static readonly TimeSpan AnimationTime = TimeSpan.FromMilliseconds(500);
/// <summary>
/// 水平方向の遷移量
/// </summary>
private double HorizontalOffset { get { return this.ActualWidth + 10; } }
#endregion private フィールド}
}
Content プロパティの変化を捕捉して TranslateTransform によって 2 つのコンテンツを水平移動するコントロールでしたね。これを TabControl で使います。
<YK:Window x:Class="TabSample.Views.MainView"
xmlns="http://schemas.microsoft.com/winfx/2006/xaml/presentation"
xmlns:x="http://schemas.microsoft.com/winfx/2006/xaml"
xmlns:YK="clr-namespace:YKToolkit.Controls;assembly=YKToolkit.Controls"
xmlns:vw="clr-namespace:TabSample.Views"
Title="MainView"
Width="300" Height="200">
<DockPanel>
<ComboBox x:Name="combobox" DockPanel.Dock="Bottom" SelectedIndex="0">
<ComboBoxItem>Content01</ComboBoxItem>
<ComboBoxItem>Content02</ComboBoxItem>
<ComboBoxItem>Content03</ComboBoxItem>
</ComboBox>
<TabControl SelectedIndex="{Binding SelectedIndex, ElementName=combobox}">
<TabControl.Template>
<ControlTemplate TargetType="{x:Type TabControl}">
<vw:TransitionPanel Content="{Binding SelectedContent, RelativeSource={RelativeSource TemplatedParent}}" />
</ControlTemplate>
</TabControl.Template>
<TabItem>
<Grid DataContext="{Binding Content01ViewModel}">
<CheckBox Content="{Binding Caption}" />
</Grid>
</TabItem>
<TabItem>
<Grid DataContext="{Binding Content02ViewModel}">
<TextBlock Text="{Binding Caption}" />
</Grid>
</TabItem>
<TabItem>
<Grid DataContext="{Binding Content03ViewModel}">
<TextBlock Text="{Binding Caption}" />
</Grid>
</TabItem>
</TabControl>
</DockPanel>
</YK:Window>
そう、TabControl でコンテンツを表示するときに ContentPresenter を指定していましたね。これを TransitionPanel に差し替えるだけです。ただし、SelectedContent で渡ってくる要素は TabItem ではなく、その直下の要素になるため、DataContext を切り替える場合はこの例のように TabItem 直下に Grid など親要素となるパネルを置き、その DataContext を明確に指定するようにします。
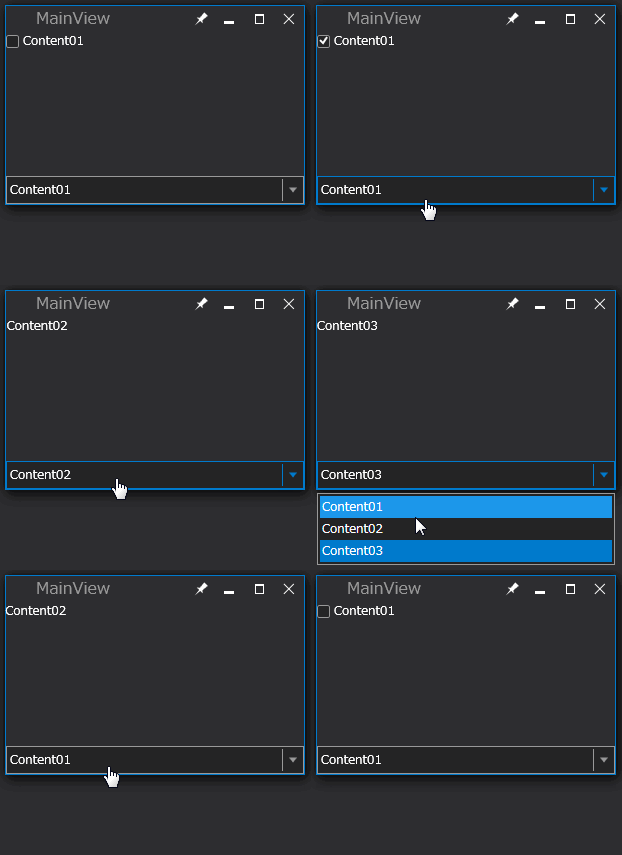
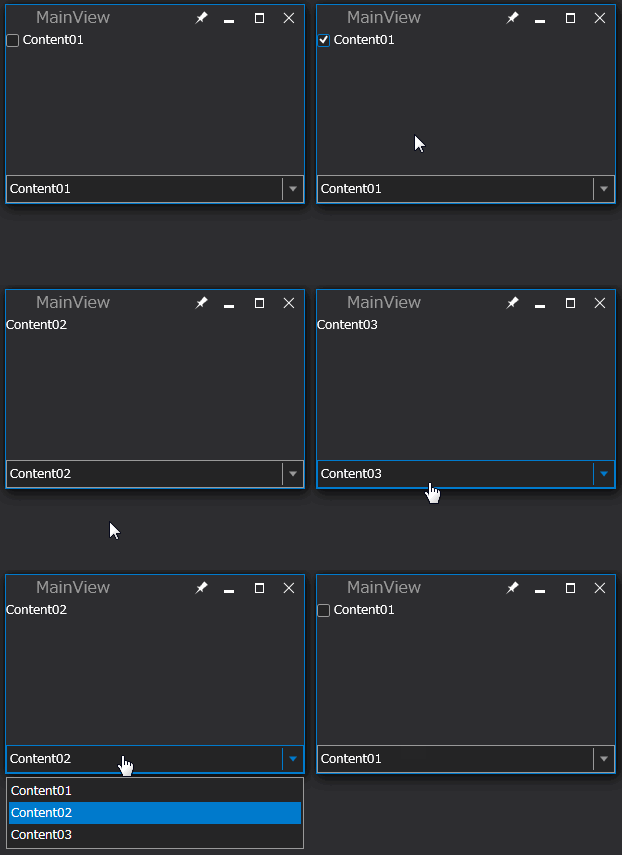
一番最初に紹介した外観とまったく同じものができあがりました。違いは DataTemplate による View と ViewModel の紐付けをしていないところです。また、だからといって App クラスにややこしい GetView() などというメソッドも作っていません。単に MainView.xaml に各コンテンツを配置しているだけでわかりやすくなりました。
Tweet
WPF で画面遷移する方法 3
コンテンツを切り替えるコントロールといえば真っ先に TabControl を想像しますよね。というわけで今回は TabControl を少しカスタマイズしてみます。
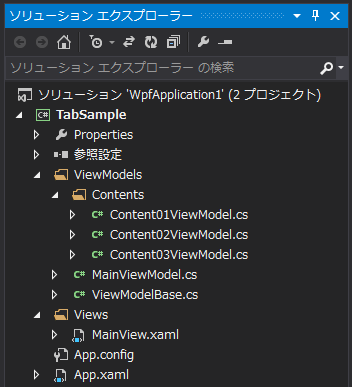
構成は単純で、MainView ウィンドウに対する MainViewModel と、各コンテンツに対する ViewModel として Content01ViewModel、Content02ViewModel、Content03ViewModel があります。 Content01ViewModel などに対する View は MainView.xaml の中に記述するため、ファイルとしては分かれていません。
それではまず MainViewModel のソースから説明します。
namespace TabSample.ViewModels
{using YKToolkit.Bindings;
internal class MainViewModel : NotificationObject
{private ViewModelBase _content01ViewModel = new Content01ViewModel();
public ViewModelBase Content01ViewModel { get { return this._content01ViewModel; } }
private ViewModelBase _content02ViewModel = new Content02ViewModel();
public ViewModelBase Content02ViewModel { get { return this._content02ViewModel; } }
private ViewModelBase _content03ViewModel = new Content03ViewModel();
public ViewModelBase Content03ViewModel { get { return this._content03ViewModel; } }
}
}
愚鈍に各コンテンツの ViewModel のインスタンスを保持、公開しているだけです。各コンテンツの ViewModel は Caption プロパティを持っています。例えば Content01ViewModel クラスは次のようになっています。
namespace TabSample.ViewModels
{internal class Content01ViewModel : ViewModelBase
{public string Caption { get { return "Content01"; } }
}
}
さて、MainView ウィンドウに TabControl を配置しましょう。
<YK:Window x:Class="TabSample.Views.MainView"
xmlns="http://schemas.microsoft.com/winfx/2006/xaml/presentation"
xmlns:x="http://schemas.microsoft.com/winfx/2006/xaml"
xmlns:YK="clr-namespace:YKToolkit.Controls;assembly=YKToolkit.Controls"
Title="MainView"
Width="300" Height="200">
<DockPanel>
<TabControl>
<TabItem DataContext="{Binding Content01ViewModel}" Header="{Binding Caption}">
<CheckBox Content="{Binding Caption}" />
</TabItem>
<TabItem DataContext="{Binding Content02ViewModel}" Header="{Binding Caption}">
<TextBlock Text="{Binding Caption}" />
</TabItem>
<TabItem DataContext="{Binding Content03ViewModel}" Header="{Binding Caption}">
<TextBlock Text="{Binding Caption}" />
</TabItem>
</TabControl>
</DockPanel>
</YK:Window>
各コンテンツのレイアウトを MainView.xaml 内に書いてしまいます。あまり長くなるのが嫌だったり、明確にファイルを別にしたい場合は独自のユーザコントロールを置くなどして対処すればいいかと思います。ここでは簡略化のため同一 xaml 内で、しかもコントロールを 1 つだけ置いています。
また、ここではあえてすべてのコンテンツの DataContext に別物を指定していますが、指定しなくてもいいし、同じものを指定してもいいと思います。
あ、うん。TabControl ってこんな感じだよね。
これでいい場合はこれでいいんですが、そうじゃないですよね。つまり、TabControl のタブの部分が邪魔です。というわけで Template プロパティをいじって TabPanel の部分を表示しないようにしてしまいます。
<YK:Window x:Class="TabSample.Views.MainView"
xmlns="http://schemas.microsoft.com/winfx/2006/xaml/presentation"
xmlns:x="http://schemas.microsoft.com/winfx/2006/xaml"
xmlns:YK="clr-namespace:YKToolkit.Controls;assembly=YKToolkit.Controls"
Title="MainView"
Width="300" Height="200">
<DockPanel>
<TabControl SelectedIndex="0">
<TabControl.Template>
<ControlTemplate TargetType="{x:Type TabControl}">
<ContentPresenter x:Name="PART_SelectedContentHost" ContentSource="SelectedContent" />
</ControlTemplate>
</TabControl.Template>
<TabItem DataContext="{Binding Content01ViewModel}">
<CheckBox Content="{Binding Caption}" />
</TabItem>
<TabItem DataContext="{Binding Content02ViewModel}">
<TextBlock Text="{Binding Caption}" />
</TabItem>
<TabItem DataContext="{Binding Content03ViewModel}">
<TextBlock Text="{Binding Caption}" />
</TabItem>
</TabControl>
</DockPanel>
</YK:Window>
TabControl のカスタマイズについては MSDN のサイトが参考になります。
本来は TabControl の Template に TabPanel コントロールを配置することでタブ部分を表示させますが、これを配置せずに ContentPresenter だけを配置します。タブ部分が表示されなくなるので、各 TabItem コントロールの Header プロパティは不要になります。また、デフォルトで 0 番目のコンテンツが選択されるように TabControl の SelectedIndex プロパティを指定しています。
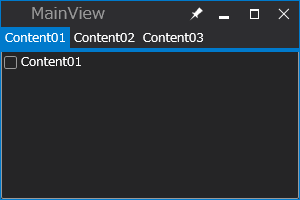
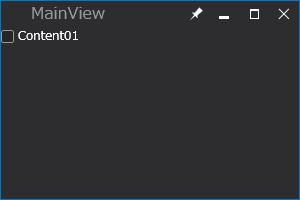
狙い通りタブ部分が表示されなくなりました。
さらにコンテンツを選択できるようにすれば見た目で TabControl を使っているとは思えない外観になります。
<YK:Window x:Class="TabSample.Views.MainView"
xmlns="http://schemas.microsoft.com/winfx/2006/xaml/presentation"
xmlns:x="http://schemas.microsoft.com/winfx/2006/xaml"
xmlns:YK="clr-namespace:YKToolkit.Controls;assembly=YKToolkit.Controls"
Title="MainView"
Width="300" Height="200">
<DockPanel>
<ComboBox x:Name="combobox" DockPanel.Dock="Bottom" SelectedIndex="0">
<ComboBoxItem>Content01</ComboBoxItem>
<ComboBoxItem>Content02</ComboBoxItem>
<ComboBoxItem>Content03</ComboBoxItem>
</ComboBox>
<TabControl SelectedIndex="{Binding SelectedIndex, ElementName=combobox}">
<TabControl.Template>
<ControlTemplate TargetType="{x:Type TabControl}">
<ContentPresenter x:Name="PART_SelectedContentHost" ContentSource="SelectedContent" />
</ControlTemplate>
</TabControl.Template>
<TabItem DataContext="{Binding Content01ViewModel}">
<CheckBox Content="{Binding Caption}" />
</TabItem>
<TabItem DataContext="{Binding Content02ViewModel}">
<TextBlock Text="{Binding Caption}" />
</TabItem>
<TabItem DataContext="{Binding Content03ViewModel}">
<TextBlock Text="{Binding Caption}" />
</TabItem>
</TabControl>
</DockPanel>
</YK:Window>
Content01View のチェックボックスを入れた状態で画面遷移し、戻ってきてもちゃんとチェックが入った状態になっています。MainView.xaml に各コンテンツのインスタンスを配置しているため、View のインスタンスが保持されるからですね。
ところが、これでは前回までのように画面遷移時のアニメーションが実現できません。次回は TabControl による画面遷移でアニメーションをおこなってみます。
Tweet
WPF で画面遷移する方法 2
前回までで画面遷移することはできましたが、View のインスタンスを誰も保持していなかったため、同じ画面に戻ってきたつもりでも、再びコンストラクタから再構築された別のインスタンスになってしまっていたため、チェックボックスの状態やスクロールバーの状態はすべて初期化されてしまうといった現象が起こってしまいました。今回は View のインスタンスを保持することでこのような現象を回避してみたいと思います。
というわけでさっそく View のインスタンスを App クラスで保持します。
namespace WpfApplication1{using System.Collections.Generic;
using System.Windows;
using System.Windows.Controls;
using WpfApplication1.ViewModels;
using WpfApplication1.Views;
/// <summary>
/// App.xaml の相互作用ロジック
/// </summary>
public partial class App : Application
{protected override void OnStartup(StartupEventArgs e)
{base.OnStartup(e);
Instance = this;
var w = new MainView() { DataContext = new MainViewModel() };
w.Show();}
private Dictionary<string, Control> _viewDictionary = new Dictionary<string, Control>()
{{ "Content01", new Content01View() { DataContext = new Content01ViewModel() } },{ "Content02", new Content02View() { DataContext = new Content02ViewModel() } },{ "Content03", new Content03View() { DataContext = new Content03ViewModel() } },};
public static App Instance { get; private set; }
public Control GetView(string key)
{Control control;return this._viewDictionary.TryGetValue(key, out control) ? control : null;
}
}
}
View のインスタンスを扱うので同じく View で保持したくなりますが、これらに対する DataContext である ViewModel のインスタンスも登場してしまうため、必然的に View と ViewModel の両方を知り得る App クラスが保持することになります。
View は ViewModel に依存するが、そのインスタンスを知る必要はない、ということです。
保持した情報を外部から取得できるように GetView() メソッドを定義しています。このメソッドを利用してコンテンツを切り替えられるように TransitionPanel の内部実装を少し変更します。
public static readonly DependencyProperty ContentSelectorProperty = DependencyProperty.Register("ContentSelector", typeof(string), typeof(TransitionPanel), new PropertyMetadata(null, OnContentSelectorPropertyChanged));
public string ContentSelector
{get { return (string)GetValue(ContentSelectorProperty); }
set { SetValue(ContentSelectorProperty, value); }
}
private static void OnContentSelectorPropertyChanged(DependencyObject d, DependencyPropertyChangedEventArgs e)
{var control = d as TransitionPanel;
control.Content = App.Instance.GetView(control.ContentSelector);
}
変更箇所はただ一つ、ContentSelector 依存関係プロパティを追加定義します。ContentSelector プロパティ変更イベントハンドラで先ほど App クラスで定義した GetView() メソッドを使い、自身のコンテンツを自分で変更するようにします。
このように変更したため、コンテンツを指定するにはコンテンツの名前を渡すようにする必要があるため、MainViewModel と MainView を次のように変更します。
namespace WpfApplication1.ViewModels
{//using System.Collections.Generic;using YKToolkit.Bindings;
internal class MainViewModel : NotificationObject
{//private List_viewModels = new List () //{// new Content01ViewModel(),// new Content02ViewModel(),// new Content03ViewModel(),//};//public ListViewModels //{// get { return this._viewModels; }//}private DelegateCommand _changeContentCommand;
public DelegateCommand ChangeContentCommand
{get{return this._changeContentCommand ?? (this._changeContentCommand = new DelegateCommand(
p =>{this.ContentName = p as string;
}));
}
}
private string _contentName;
public string ContentName
{get { return this._contentName; }
private set { SetProperty(ref this._contentName, value); }
}
}
}
<YK:Window x:Class="WpfApplication1.Views.MainView"
xmlns="http://schemas.microsoft.com/winfx/2006/xaml/presentation"
xmlns:x="http://schemas.microsoft.com/winfx/2006/xaml"
xmlns:YK="clr-namespace:YKToolkit.Controls;assembly=YKToolkit.Controls"
xmlns:vw="clr-namespace:WpfApplication1.Views"
Title="MainView"
Width="300" Height="200">
<DockPanel>
<UniformGrid DockPanel.Dock="Bottom" Columns="3">
<Button Grid.Column="0" Content="Content01" Command="{Binding ChangeContentCommand}" CommandParameter="Content01" />
<Button Grid.Column="1" Content="Content02" Command="{Binding ChangeContentCommand}" CommandParameter="Content02" />
<Button Grid.Column="2" Content="Content03" Command="{Binding ChangeContentCommand}" CommandParameter="Content03" />
</UniformGrid>
<vw:TransitionPanel ContentSelector="{Binding ContentName}" />
</DockPanel>
</YK:Window>
前回は MainViewModel がコンテンツを切り替える元となる ViewModel を持っていたので MainViewModel が主導権を握っているような印象でしたが、今回は MainViewModel はあくまでも View からの情報を橋渡しするだけで、ContentName に指定されるコンテンツの名前は View から渡されるパラメータを横流しするだけとなっています。ViewModel が View の名前を知り得るはずもないため、あえてこのような作りになります。ただし、ContentName プロパティを変更するかどうかは相変わらず MainViewModel が判定できるので、画面遷移できるかどうかは ViewModel で判断できるようになっています。
このように実装すると、Content01View、Content02View、Content03View のインスタンスは App クラスが保持しているため、コンストラクタは 1 回だけしか処理されなくなります。このことから、画面遷移後も View の表示状態が保持されるようになります。
画面遷移するために UserControl 派生の独自のコントロールを定義して仰々しく実装していましたが、次回は TabControl を触ってみます。
Tweet
|
<< 古い記事へ |
新しい記事へ >> |
