WPF で画面遷移する方法 1 についての考察
前回では WPF で画面遷移する方法を UserControl 派生の TransitionPanel を使って実現しました。また、コンテンツの指定方法は DataTemplate を利用した方法を使いました。ここではその具体的なコードについて紹介し、ちょっとした特徴をまとめます。
まずはプロジェクトのファイル構造から。

Views フォルダに MainView を始め、前回作成した TransitionPanel と、コンテンツとして表示する Content01View、Content02View、Content03View というユーザコントロールがあります。
ViewModel フォルダにはそれぞれの View に対応した ViewModel があります。ただし、Content01ViewModel、Content02ViewModel、Content03ViewModel は ViewModelBase クラスの派生クラスとしています。
App.xaml では次のように View と ViewModel を紐付けるための DataTemplate をリソースとして定義しています。
<Application x:Class="WpfApplication1.App"
xmlns="http://schemas.microsoft.com/winfx/2006/xaml/presentation"
xmlns:x="http://schemas.microsoft.com/winfx/2006/xaml"
xmlns:vw="clr-namespace:WpfApplication1.Views"
xmlns:vm="clr-namespace:WpfApplication1.ViewModels">
<Application.Resources>
<DataTemplate DataType="{x:Type vm:Content01ViewModel}">
<vw:Content01View />
</DataTemplate>
<DataTemplate DataType="{x:Type vm:Content02ViewModel}">
<vw:Content02View />
</DataTemplate>
<DataTemplate DataType="{x:Type vm:Content03ViewModel}">
<vw:Content03View />
</DataTemplate>
</Application.Resources>
</Application>
各 DataTemplate に x:Key 属性を指定していないため、コンテンツとして各 ViewModel が指定されると自動的に各 DataTemplate にしたがって対応する View に変換されて表示されるようになります。ちなみに、変換された View の DataContext は変換前のデータ、すなわちここでは ViewModel となるため、Content01View などに明示的に DataContext を指定する必要はありません。
MainViewModel ではコンテンツを入れ替えるために各コンテンツの ViewModel を保持します。
namespace WpfApplication1.ViewModels
{using System.Collections.Generic;
using YKToolkit.Bindings;
internal class MainViewModel : NotificationObject
{private List<ViewModelBase> _viewModels = new List<ViewModelBase>()
{new Content01ViewModel(),
new Content02ViewModel(),
new Content03ViewModel(),
};
public List<ViewModelBase> ViewModels
{get { return this._viewModels; }
}
}
}
MainViewModel が公開するプロパティを使って MainView を次のように定義します。
<YK:Window x:Class="WpfApplication1.Views.MainView"
xmlns="http://schemas.microsoft.com/winfx/2006/xaml/presentation"
xmlns:x="http://schemas.microsoft.com/winfx/2006/xaml"
xmlns:YK="clr-namespace:YKToolkit.Controls;assembly=YKToolkit.Controls"
xmlns:vw="clr-namespace:WpfApplication1.Views"
Title="MainView"
Width="300" Height="200">
<DockPanel>
<ComboBox x:Name="combobox" DockPanel.Dock="Bottom" ItemsSource="{Binding ViewModels}" DisplayMemberPath="Caption" SelectedIndex="0" />
<vw:TransitionPanel Content="{Binding SelectedItem, ElementName=combobox}" />
</DockPanel>
</YK:Window>
ComboBox で ViewModel のリストを表示し、選択された ViewModel を TransitionPanel のコンテンツとして表示するようにしています。ちなみに Content01ViewModel クラスの中身は次のようになっています。
namespace WpfApplication1.ViewModels
{internal class Content01ViewModel : ViewModelBase
{public string Caption { get { return "Content01"; } }
}
}
Content02ViewModel と Content03ViewModel も同様になっています。
Content01View は例えば次のようにチェックボックスを配置しておきます。
<UserControl x:Class="WpfApplication1.Views.Content01View"
xmlns="http://schemas.microsoft.com/winfx/2006/xaml/presentation"
xmlns:x="http://schemas.microsoft.com/winfx/2006/xaml"
xmlns:mc="http://schemas.openxmlformats.org/markup-compatibility/2006"
xmlns:d="http://schemas.microsoft.com/expression/blend/2008"
mc:Ignorable="d"
d:DesignHeight="300" d:DesignWidth="300">
<Grid>
<CheckBox Content="Content01" />
</Grid>
</UserControl>
Content02View と Content03View も適当にコントロールを配置しておきます。
それでは実行してみましょう。
無事画面遷移できました。
ところで、せっかく配置したチェックボックスにチェックを入れて画面遷移してみましょう。

なんと、チェックを入れた状態で画面遷移して戻ってくると、チェック状態がリセットされています。もう少し解析するために、Content01View のコードビハインドに次のようなコードを追加します。
namespace WpfApplication1.Views
{using System.Windows.Controls;
/// <summary>
/// Content01View.xaml の相互作用ロジック
/// </summary>
public partial class Content01View : UserControl
{public Content01View(){System.Diagnostics.Debug.WriteLine("Content01View() コンストラクタ");
InitializeComponent();
}
}
}
Content02View、Content03View も同様にコンストラクタでデバッグ出力をおこなうようにしてからもう一度実行してみましょう。
Content02View、Content03View は初めて表示されるのでコンストラクタが走るのは当然ですが、その後に一度表示したはずの Content01View がまたコンストラクタから処理されていることがわかります。
実は、これは DataTemplate を使って View と ViewModel を紐付けていることが原因です。DataTemplate は指定された型のデータを指定されたテンプレートに変換して表示するためのテンプレートです。つまり、データが指定される度にテンプレートからコンテンツを毎回構築してしまいます。
このサンプルのようにチェックボックスの状態くらいなら ViewModel 側でデータを保持し、それをデータバインディングすることで解決できそうですが、それ以外にも、例えば ListBox の選択状態だったり、そのアイテムを表示するためのスクロールバーの状態だったり、そのすべてを ViewModel 側で保持しようとすると、技術的には可能かもしれませんが、あまり現実的ではありません。
今回の現象の肝は、ViewModel のインスタンスは MainViewModel クラスが保持しているのに対し、Content01View などの View のインスタンスは誰も保持していないことにあります。DataTemplate によって View と ViewModel を紐付けることで実現する画面遷移はお手軽ではありますが、システム要件によってはちょっと使い勝手が悪くなってしまうので注意が必要です。
というわけで View のインスタンスもちゃんと保持する画面遷移について後日紹介します。
Tweet
WPF で画面遷移する方法 1
唐突に WPF で画面遷移する方法のひとつをここにまとめます。
ここで紹介する方法では、独自の UserControl を使用する方法で、 Content プロパティの値を切り替えると自動的にアニメーションで遷移するものです。
というわけで早速 UserControl 派生の TransitionPanel コントロールを次のように定義します。まずは XAML から。
<UserControl x:Class="SlideContents.Views.TransitionPanel"
xmlns="http://schemas.microsoft.com/winfx/2006/xaml/presentation"
xmlns:x="http://schemas.microsoft.com/winfx/2006/xaml"
xmlns:mc="http://schemas.openxmlformats.org/markup-compatibility/2006"
xmlns:d="http://schemas.microsoft.com/expression/blend/2008"
mc:Ignorable="d"
d:DesignWidth="400" d:DesignHeight="600"
x:Name="root">
<Grid>
<ContentControl Content="{Binding ContentA, ElementName=root}">
<ContentControl.RenderTransform>
<TranslateTransform X="{Binding OffsetXA, ElementName=root}" Y="{Binding OffsetYA, ElementName=root}" />
</ContentControl.RenderTransform>
</ContentControl>
<ContentControl Content="{Binding ContentB, ElementName=root}">
<ContentControl.RenderTransform>
<TranslateTransform X="{Binding OffsetXB, ElementName=root}" Y="{Binding OffsetYB, ElementName=root}" />
</ContentControl.RenderTransform>
</ContentControl>
</Grid>
</UserControl>
Grid コントロールに 2 つの ContentControl を持たせていますが、それぞれ RenderTransform にTranslateTransform を指定することで、水平方向に自由に移動できるようにしています。
後でコードビハインドも紹介しますが、このコントロールは DisplayA/DisplayB という遷移状態を持っていて、DisplayA 状態のときは ContentA、DisplayB 状態のときは ContentB を表示するように TranslateTransform を調整します。このとき、両方の TranslateTransform を同時にアニメーションで操作することで 2 つのコンテンツがスライドしながら画面遷移するように見せることができます。
それではコードビハインドです。
namespace SlideContents.Views
{using System;using System.Windows;
using System.Windows.Controls;
using System.Windows.Media.Animation;
/// <summary>
/// TransitionPanel.xaml の相互作用ロジック
/// </summary>
public partial class TransitionPanel : UserControl
{/// <summary>
/// 新しいインスタンスを生成します。
/// </summary>
public TransitionPanel(){InitializeComponent();
this.Loaded += OnLoaded;
}
/// <summary>
/// アニメーションの方向を表します。
/// </summary>
public enum TransitDirections
{/// <summary>
/// 左へ移動します。
/// </summary>
ToLeft,
/// <summary>
/// 右へ移動します。
/// </summary>
ToRight,
}
/// <summary>
/// 遷移状態を表します。
/// </summary>
public enum TransitionStates
{/// <summary>
/// A が表示されている状態を表します。
/// </summary>
DisplayA,
/// <summary>
/// B が表示されている状態を表します。
/// </summary>
DisplayB,
}
#region Content 依存関係プロパティ/// <summary>
/// Content 依存関係プロパティを定義し直します。
/// </summary>
public static readonly new DependencyProperty ContentProperty = DependencyProperty.Register("Content", typeof(object), typeof(TransitionPanel), new UIPropertyMetadata(null, OnConentPropertyChanged));
/// <summary>
/// コンテンツを取得または設定します。
/// </summary>
public new object Content
{get { return GetValue(ContentProperty); }
set { SetValue(ContentProperty, value); }
}
#endregion Content 依存関係プロパティ#region ContentA 依存関係プロパティ/// <summary>
/// ContentA 依存関係プロパティのキーを定義します。
/// </summary>
private static readonly DependencyPropertyKey ContentAPropertyKey = DependencyProperty.RegisterReadOnly("ContentA", typeof(object), typeof(TransitionPanel), new UIPropertyMetadata(null));
/// <summary>
/// ContentA 依存関係プロパティを定義します。
/// </summary>
public static readonly DependencyProperty ContentAProperty = ContentAPropertyKey.DependencyProperty;
/// <summary>
/// コンテンツのためのバッファ A を取得します。
/// </summary>
public object ContentA
{get { return GetValue(ContentAProperty); }
private set { SetValue(ContentAPropertyKey, value); }
}
#endregion ContentA 依存関係プロパティ#region ContentB 依存関係プロパティ/// <summary>
/// ContentB 依存関係プロパティのキーを定義します。
/// </summary>
private static readonly DependencyPropertyKey ContentBPropertyKey = DependencyProperty.RegisterReadOnly("ContentB", typeof(object), typeof(TransitionPanel), new UIPropertyMetadata(null));
/// <summary>
/// ContentB 依存関係プロパティを定義します。
/// </summary>
public static readonly DependencyProperty ContentBProperty = ContentBPropertyKey.DependencyProperty;
/// <summary>
/// コンテンツのためのバッファ B を取得します。
/// </summary>
public object ContentB
{get { return GetValue(ContentBProperty); }
private set { SetValue(ContentBPropertyKey, value); }
}
#endregion ContentB 依存関係プロパティ#region State 依存関係プロパティ/// <summary>
/// State 依存関係プロパティのキーを定義します。
/// </summary>
private static readonly DependencyPropertyKey StatePropertyKey = DependencyProperty.RegisterReadOnly("State", typeof(TransitionStates), typeof(TransitionPanel), new UIPropertyMetadata(TransitionStates.DisplayB));
/// <summary>
/// State 依存関係プロパティを定義します。
/// </summary>
public static readonly DependencyProperty StateProperty = StatePropertyKey.DependencyProperty;
/// <summary>
/// 遷移状態を取得します。
/// </summary>
public TransitionStates State
{get { return (TransitionStates)GetValue(StateProperty); }
private set { SetValue(StatePropertyKey, value); }
}
#endregion State 依存関係プロパティ#region TransitDirection 依存関係プロパティ/// <summary>
/// TransitDirection 依存関係プロパティを定義します。
/// </summary>
public static readonly DependencyProperty TransitDirectionProperty = DependencyProperty.Register("TransitDirection", typeof(TransitDirections), typeof(TransitionPanel), new UIPropertyMetadata(TransitDirections.ToLeft));
/// <summary>
/// 画面遷移方向を取得または設定します。
/// </summary>
public TransitDirections TransitDirection
{get { return (TransitDirections)GetValue(TransitDirectionProperty); }
set { SetValue(TransitDirectionProperty, value); }
}
#endregion TransitDirection 依存関係プロパティ#region OffsetXA 依存関係プロパティ/// <summary>
/// OffsetXA 依存関係プロパティを定義します。
/// </summary>
public static readonly DependencyProperty OffsetXAProperty = DependencyProperty.Register("OffsetXA", typeof(double), typeof(TransitionPanel), new UIPropertyMetadata(0.0));
/// <summary>
/// コンテンツのためのバッファ A の水平方向オフセットを取得または設定します。
/// </summary>
public double OffsetXA
{get { return (double)GetValue(OffsetXAProperty); }
set { SetValue(OffsetXAProperty, value); }
}
#endregion OffsetXA 依存関係プロパティ#region OffsetYA 依存関係プロパティ/// <summary>
/// OffsetYA 依存関係プロパティを定義します。
/// </summary>
public static readonly DependencyProperty OffsetYAProperty = DependencyProperty.Register("OffsetYA", typeof(double), typeof(TransitionPanel), new UIPropertyMetadata(0.0));
/// <summary>
/// コンテンツのためのバッファ A の垂直方向オフセットを取得または設定します。
/// </summary>
public double OffsetYA
{get { return (double)GetValue(OffsetYAProperty); }
set { SetValue(OffsetYAProperty, value); }
}
#endregion OffsetYA 依存関係プロパティ#region OffsetXB 依存関係プロパティ/// <summary>
/// OffsetXB 依存関係プロパティを定義します。
/// </summary>
public static readonly DependencyProperty OffsetXBProperty = DependencyProperty.Register("OffsetXB", typeof(double), typeof(TransitionPanel), new UIPropertyMetadata(0.0));
/// <summary>
/// コンテンツのためのバッファ B の水平方向オフセットを取得または設定します。
/// </summary>
public double OffsetXB
{get { return (double)GetValue(OffsetXBProperty); }
set { SetValue(OffsetXBProperty, value); }
}
#endregion OffsetXB 依存関係プロパティ#region OffsetYB 依存関係プロパティ/// <summary>
/// OffsetYB 依存関係プロパティを定義します。
/// </summary>
public static readonly DependencyProperty OffsetYBProperty = DependencyProperty.Register("OffsetYB", typeof(double), typeof(TransitionPanel), new UIPropertyMetadata(0.0));
/// <summary>
/// コンテンツのためのバッファ B の垂直方向オフセットを取得または設定します。
/// </summary>
public double OffsetYB
{get { return (double)GetValue(OffsetYBProperty); }
set { SetValue(OffsetYBProperty, value); }
}
#endregion OffsetYB 依存関係プロパティ#region イベントハンドラ/// <summary>
/// Load イベントハンドラ
/// </summary>
/// <param name="sender">イベント発行元</param>
/// <param name="e">イベント引数</param>
private void OnLoaded(object sender, RoutedEventArgs e)
{var storyboard = new Storyboard();
storyboard.Children = new TimelineCollection()
{CreateMoveAnimation(TimeZero, TimeZero, this.HorizontalOffset, "OffsetXB"),
};
storyboard.Begin();}
/// <summary>
/// Content 依存関係プロパティ変更イベントハンドラ
/// </summary>
/// <param name="d">イベント発行元</param>
/// <param name="e">イベント引数</param>
private static void OnConentPropertyChanged(DependencyObject d, DependencyPropertyChangedEventArgs e)
{var control = d as TransitionPanel;
if (control.IsInitialized) control.SwapDisplay();
}
#endregion イベントハンドラ#region ヘルパ/// <summary>
/// コンテンツを入れ替えます。
/// </summary>
private void SwapDisplay()
{if (this.State == TransitionStates.DisplayA)
{this.ContentB = this.Content;
this.State = TransitionStates.DisplayB;
}
else{this.ContentA = this.Content;
this.State = TransitionStates.DisplayA;
}
if ((this.ContentA != null) && (this.ContentB != null))
StartAnimation();
}
/// <summary>
/// 画面遷移を開始します。
/// </summary>
private void StartAnimation()
{var storyboard = this.State == TransitionStates.DisplayA ? CreateAnimationBtoA(this.TransitDirection) : CreateAnimationAtoB(this.TransitDirection);
storyboard.Begin();}
/// <summary>
/// ContentB から ContentA へ遷移するためのストーリーボードを生成します。
/// </summary>
/// <param name="direction">遷移する方向を指定します。</param>
/// <returns>生成したストーリーボードを返します。</returns>
private Storyboard CreateAnimationBtoA(TransitDirections direction)
{var storyboard = new Storyboard();
storyboard.Children = direction == TransitDirections.ToLeft ?
new TimelineCollection()
{CreateMoveAnimation(TimeZero, TimeZero, this.HorizontalOffset, "OffsetXA"),
CreateMoveAnimation(TimeZero, AnimationTime, 0, "OffsetXA"),
CreateMoveAnimation(TimeZero, AnimationTime, -this.HorizontalOffset, "OffsetXB"),
} :new TimelineCollection()
{CreateMoveAnimation(TimeZero, TimeZero, -this.HorizontalOffset, "OffsetXA"),
CreateMoveAnimation(TimeZero, AnimationTime, 0, "OffsetXA"),
CreateMoveAnimation(TimeZero, AnimationTime, this.HorizontalOffset, "OffsetXB"),
};
return storyboard;}
/// <summary>
/// ContentA から ContentB へ遷移するためのストーリーボードを生成します。
/// </summary>
/// <param name="direction">遷移する方向を指定します。</param>
/// <returns>生成したストーリーボードを返します。</returns>
private Storyboard CreateAnimationAtoB(TransitDirections direction)
{var storyboard = new Storyboard();
storyboard.Children = direction == TransitDirections.ToLeft ?
new TimelineCollection()
{CreateMoveAnimation(TimeZero, TimeZero, this.HorizontalOffset, "OffsetXB"),
CreateMoveAnimation(TimeZero, AnimationTime, 0, "OffsetXB"),
CreateMoveAnimation(TimeZero, AnimationTime, -this.HorizontalOffset, "OffsetXA"),
} :new TimelineCollection()
{CreateMoveAnimation(TimeZero, TimeZero, -this.HorizontalOffset, "OffsetXB"),
CreateMoveAnimation(TimeZero, AnimationTime, 0, "OffsetXB"),
CreateMoveAnimation(TimeZero, AnimationTime, this.HorizontalOffset, "OffsetXA"),
};
return storyboard;}
/// <summary>
/// Double 型のプロパティに対するアニメーションを生成します。
/// </summary>
/// <param name="beginTime">アニメーションの開始時間を指定します。</param>
/// <param name="duration">アニメーションの実行時間を指定します。</param>
/// <param name="to">プロパティ値の最終値を指定します。</param>
/// <param name="targetPropertyName">対象とするプロパティ名を指定します。</param>
/// <returns>Storyboard の添付プロパティを設定したアニメーションを返します。</returns>
private DoubleAnimation CreateMoveAnimation(TimeSpan beginTime, TimeSpan duration, double to, string targetPropertyName)
{var animation = new DoubleAnimation()
{To = to,BeginTime = beginTime,Duration = new Duration(duration),
AccelerationRatio = 0.3,
DecelerationRatio = 0.3,
};
Storyboard.SetTarget(animation, this);
Storyboard.SetTargetProperty(animation, new PropertyPath(targetPropertyName));
return animation;}
#endregion ヘルパ#region private フィールド/// <summary>
/// 時刻ゼロ
/// </summary>
private static readonly TimeSpan TimeZero = TimeSpan.FromMilliseconds(0);
/// <summary>
/// アニメーション時間
/// </summary>
private static readonly TimeSpan AnimationTime = TimeSpan.FromMilliseconds(500);
/// <summary>
/// 水平方向の遷移量
/// </summary>
private double HorizontalOffset { get { return this.ActualWidth + 10; } }
#endregion private フィールド}
}
長い…。
Content プロパティが変更されたタイミングで 269 行目の SwapDisplay() メソッドを呼ぶようにします。すると 300 行目の CreateAnimationBtoA() によって生成される ContentB から ContentA へ遷移するアニメーション、または 326 行目の CreateAnimationAtoB() メソッドによって生成される ContentA から ContentB へ遷移するアニメーションが実行されます。
この TransitionPanel を実際に使ってみるとこんな感じになります。
ちなみに、Content プロパティに指定するオブジェクトはなんでもいいですが、ここでの例では表示するコンテンツに対する ViewModel のクラスを指定し、型に対する DataTemplate を App クラスの Resoureces にあらかじめ指定する方法を使っています。長くなってきたのでコードは割愛。
Tweet
Visual Studio の拡張機能の開発を始められなかった
以前の記事で Visual Studio の拡張機能を開発すべく SDK をインストールしたわけですが、
どういうわけかプロジェクトを新規作成しようとするとエラーが発生してしまい、まったく手がつけられませんでした。
今思えばそのときのスクリーンショットを取っておくべきでした…。
確か "Project 要素の下の #Text 要素が認識できない" とかなんとかいうエラーメッセージで、
プロジェクトファイルの生成に失敗しているような内容でした。
ただ、プロジェクトファイルをテキストエディタで覗いて見ても "#Text" なる要素は見当たらず。
Google 先生に聞いてみても真面目に回答してくれる様子もなかったので諦めました。
気になった点といえば、日本語版の Visual Studio に英語版の SDK を入れていたことくらいですが、SDK の日本語版はどこにも見当たりませんでした。
そういうわけでインストールした SDK をアンインストールしたわけですが、ここでもまた一難。
アンインストール後、Visual Studio でプロジェクトを新規に作成しようとしたり、既存プロジェクトを立ち上げた状態でクラスなどを追加しようとするとフリーズ!
新規プロジェクトを作成しようとしただけでずっとこのダイアログが出たままお亡くなりになった。 #VS2013 pic.twitter.com/g3zcjfEKbl
— ゆうじろ (@twyujiro15) 2017年4月11日
そういえば Visual Studio SDK をアンインストールしてから VIsual Studio 触るの初めてだ・・・。アイツのせいか!
— ゆうじろ (@twyujiro15) 2017年4月11日
どうやらプロジェクトなどの追加項目に関するテンプレートにゴミが入り込んだのか、テンプレート読み込みの段階でフリーズするようになってしまいました。
仕方がないので修復作業へ。
きっと悩んでいても埒が明かないので迷わず修復作業へ。 pic.twitter.com/ZcW8ynYSub
— ゆうじろ (@twyujiro15) 2017年4月11日
ちょっとちょっと、まだ終わらないんですけど! pic.twitter.com/mJS4sRVosc
— ゆうじろ (@twyujiro15) 2017年4月12日
7:30 頃から初めて今 17:00 過ぎ…。やがて 10 時間になるぞ。何やってんだ。
— ゆうじろ (@twyujiro15) 2017年4月12日
なぜか修復作業に 10 時間以上もかかるという所業。なぜだ。
新しいことを始めようというウキウキ感からの絶望を味わったのでもう二度と Visual Studio 2013 による拡張機能開発をやるつもりはありません。
Tweet
Visual Studio の拡張機能の開発を始めてみる
普段お世話になっている Visual Studio の拡張機能ですが、自分でも作ってみたくなって調べたところ、
とりあえず Visual Studio SDK なるものが必要ということで、
さっそくダウンロード&インストール。
自分が普段 Visual Studio 2013 使ってるから 2013 の SDK で開発するけど、
もしかして上位バージョンに対応するにはそのバージョンの SDK じゃないとできないのかな?
互換性があるものと信じたいけど、"2017 に対応しました" の更新をよく見かけるからあまり期待してはいけない。
というわけで結局オレオレ拡張機能になってしまいそうだ。ま、いっか。
興味本位でインストールしたけど 1 時間かかった…。長かった。
Tweet
モダンなインストーラへの道 3 ~ カスタム UI を msi インストーラパッケージと紐付ける ~
前回までで、簡単なインストーラを作成するこ]とができるようになりました。
今回は、いよいよカスタム UI をインストーラとして使用できるようにしたいと思います。
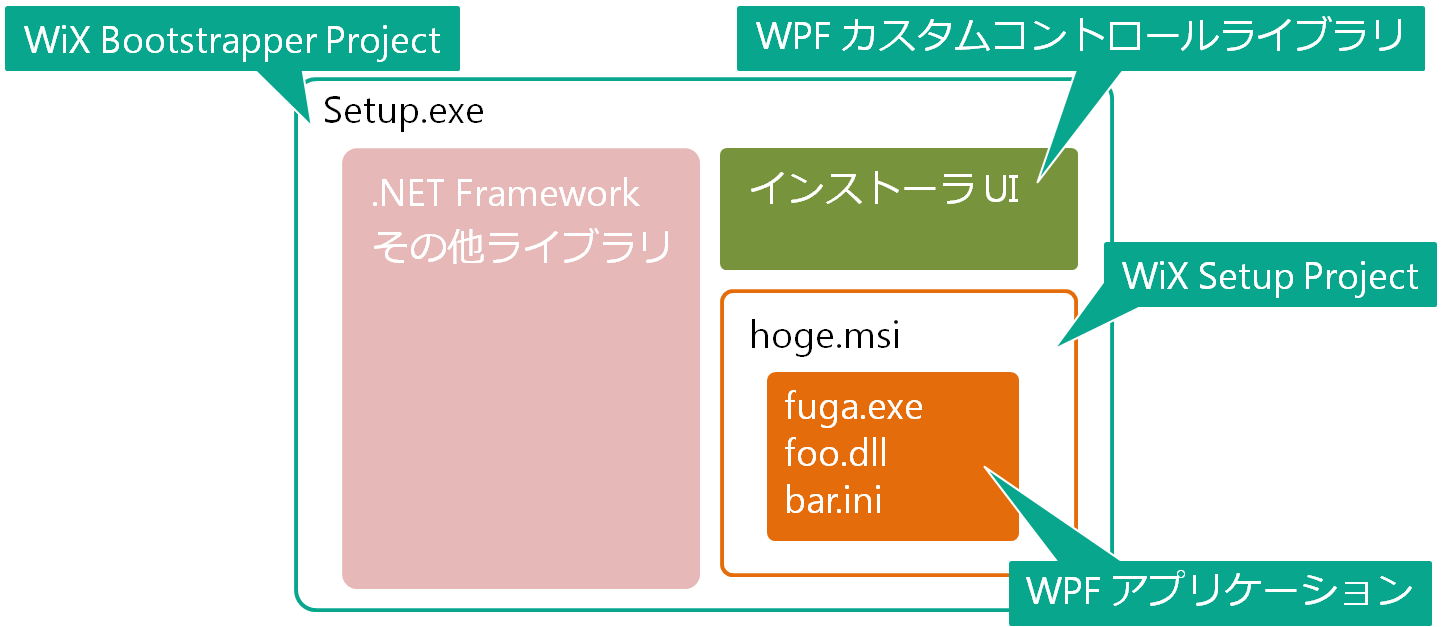
WiX では Bootstrapper Project によって msi インストーラパッケージやカスタム UI の dll ファイルをすべてペイロードとして exe パッケージを作成します。
イメージとしては次のようになります。
そんなわけでカスタム UI の参照は DLL 経由となります。
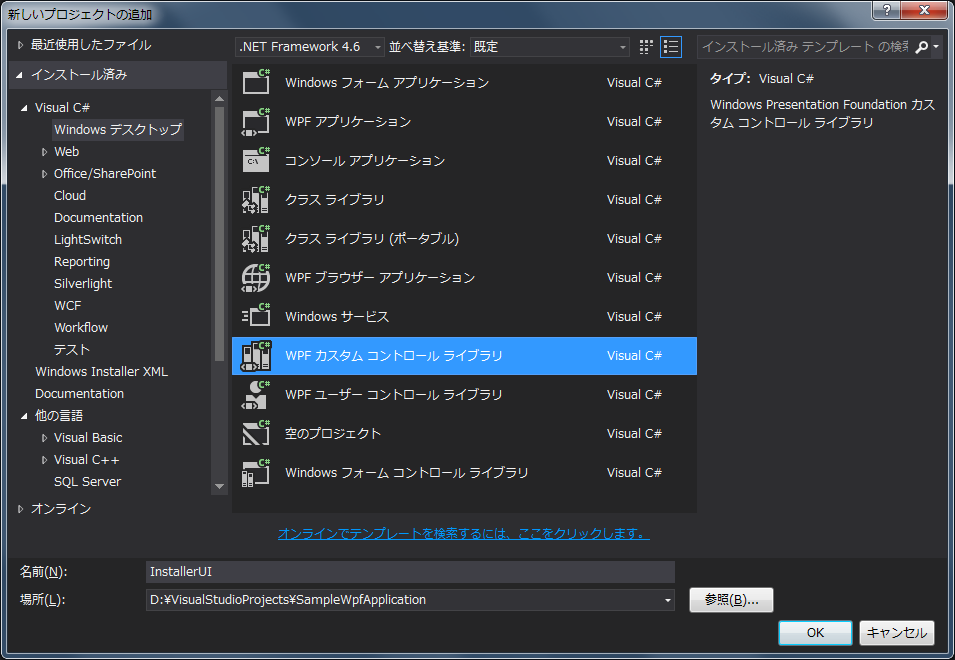
そこで、まずインストーラとして使用する UI を作成するためのプロジェクトを追加しましょう。
ここでは WPF カスタムコントロールライブラリのプロジェクトを "InstallerUI" という名前で追加します。
WPF カスタムコントロールライブラリのプロジェクト構成はデフォルトでは次のようになっています。
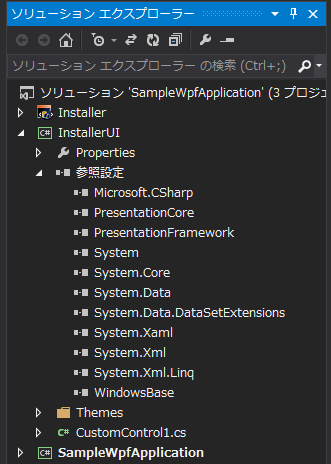
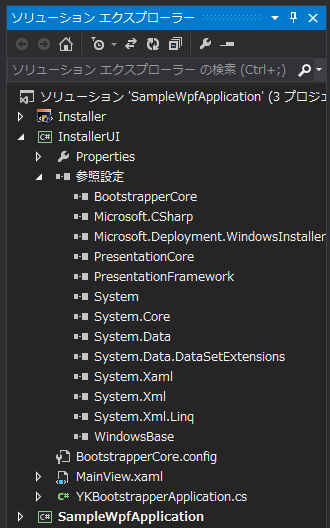
インストーラ用の UI として WiX と紐付けるために、参照設定などを次のように変更します。
- Themes フォルダならびに CustomControl1.cs を削除
- 参照設定に以下を追加
BootstrapperCore.dll
Microsoft.Deployment.WindowsInstaller.dll
どちらも C:\Program Files\WiX Toolset v3.10\SDK\ にあります。 - アプリケーション構成ファイル BootstrapperCore.config を追加
- ウィンドウとして MainView クラスを追加
- YKBootstrapperApplication クラスを追加
アプリケーション構成ファイルの中身は次のようにします。
xml version="1.0" encoding="utf-8" ?><configuration>
<configSections>
<sectionGroup name="wix.bootstrapper" type="Microsoft.Tools.WindowsInstallerXml.Bootstrapper.BootstrapperSectionGroup, BootstrapperCore">
<section name="host" type="Microsoft.Tools.WindowsInstallerXml.Bootstrapper.HostSection, BootstrapperCore" />
</sectionGroup>
</configSections>
<startup>
<supportedRuntime version="v4.0" sku=".NETFramework,Version=v4.6" />
</startup>
<wix.bootstrapper>
<host assemblyName="InstallerUI" />
</wix.bootstrapper>
</configuration>
また、YKBootstrapperApplication クラスは Microsoft.Tools.WindowsInstallerXml.Bootstrapper.BootstrapperApplication クラスを基本クラスとして次のように定義します。
namespace InstallerUI{using Microsoft.Tools.WindowsInstallerXml.Bootstrapper;
using System.Windows.Threading;
public class YKBootstrapperApplication : BootstrapperApplication
{protected override void Run()
{var dispatcher = Dispatcher.CurrentDispatcher;
var w = new MainView();
w.Closed += (_, __) => dispatcher.InvokeShutdown();
this.Engine.Detect();
w.Show();Dispatcher.Run();
this.Engine.Quit(0);
}
}
}
WiX の Bootstrapper Project からこの WPF カスタムコントロールライブラリの DLL ファイルを参照されるようになりますが、
実は、このときのエントリポイントが BootstrapperApplication クラスの Run() メソッドになります。
したがって、通常の WPF アプリケーションプロジェクトで Application クラスの Startup() メソッドでおこなっていたような処理を、この Run() メソッドでおこなうことになります。
ここでは MainView ウィンドウを表示するようにしています。
14 行目の Detect() メソッドは Microsoft.Tools.WindowsInstallerXml.Bootstrapper.Engine クラスに用意されているメソッドで、インストール条件がすべて満たされているかどうかを確認しています。
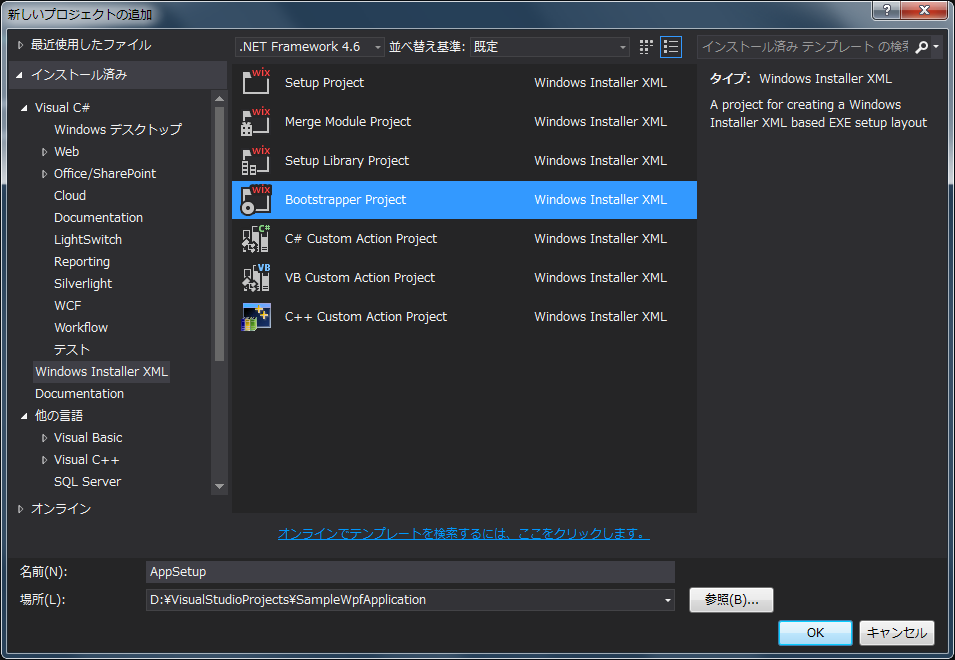
それでは、WiX の Bootstrapper Project のプロジェクトをソリューションに追加しましょう。
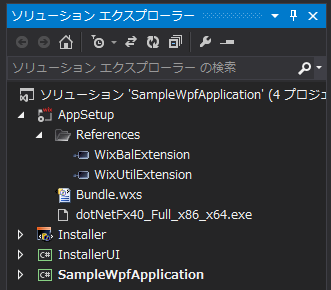
Bundle.wxs というファイルでインストーラの exe ファイルを生成するための XML コードを記述します。
デフォルトのままでは少し足りないので、次のような変更をしています。
- References に WixUtilExtension.dll への参照を追加
"References" を右クリックし、「参照の追加」メニューから簡単に追加できます。 - .NET Framework のインストーラ dotNetFx40_Full_x86_x64.exe をプロジェクトに追加
WiX によって生成するインストーラは、通常は .NET Framework を必要としないインストーラですが、
カスタム UI を使用する場合は .NET Framework が必要となるため、インストーラ用に .NET Framework のインストーラが必要になります。
web 経由で指定することもできるようですが、ここではローカルに .NET Framework のインストーラを保存し、これを参照するようにするため、ダウンロードしてきた .NET Framework のインストーラをプロジェクトのファイルとして含めています。
このファイルはこちらからダウンロードできます。
それでは、Bundle.wxs の中身について見てみましょう。
xml version="1.0" encoding="UTF-8"?><Wix xmlns="http://schemas.microsoft.com/wix/2006/wi" xmlns:util="http://schemas.microsoft.com/wix/UtilExtension">
<Bundle Name="AppSetup" Version="1.0.0.0" Manufacturer="YKSoftware" UpgradeCode="b8dbe519-5748-4e6e-a73d-9404b7fccbec">
<BootstrapperApplicationRef Id="ManagedBootstrapperApplicationHost">
<Payload SourceFile="../InstallerUI/BootstrapperCore.config" />
<Payload SourceFile="../InstallerUI/bin/Release/InstallerUI.dll" />
<Payload SourceFile="C:/Program Files/WiX Toolset v3.10/SDK/Microsoft.Deployment.WindowsInstaller.dll" />
</BootstrapperApplicationRef>
<Chain>
<PackageGroupRef Id="Netfx4Full" />
<MsiPackage Id="SampleWpfApplicationInstallerPackage" SourceFile="../Installer/bin/Release/Installer.msi" Cache="yes" Vital="no" />
</Chain>
</Bundle>
<Fragment>
<WixVariable Id="WixMbaPrereqPackageId" Value="Netfx4Full" />
<WixVariable Id="WixMbaPrereqLicenseUrl" Value="NetfxLicense.rtf" />
<util:RegistrySearch Root="HKLM" Key="SOFTWARE/NET Framework Setup/NDP/v4/Full" Value="Version" Variable="Netfx4FullVersion" />
<util:RegistrySearch Root="HKLM" Key="SOFTWARE/NET Framework Setup/NDP/v4/Full" Value="Version" Variable="Netfx4x64FullVersion" Win64="yes" />
<PackageGroup Id="Netfx4Full">
<ExePackage Id="Netfx4Full" Cache="no" Compressed="yes" PerMachine="yes"
Permanent="yes" Vital="yes" SourceFile="../../dotNetFx40_Full_x86_x64.exe"
DetectCondition="Netfx4FullVersion AND (NOT VersionNT64 OR Netfx4x64FullVersion)"
InstallCondition="(VersionNT < v6.0 OR VersionNT64 < v6.0) AND (NOT (Net4FullVersion OR Net4x64FullVersion))" />
</PackageGroup>
</Fragment>
</Wix>
ペイロードするものをすべて BootstrapperApplicationRef に登録しています。
ここではカスタム UI のアプリケーション構成ファイルと生成物である dll ファイルを指定しています。
また、カスタム UI に必要な外部参照ファイルを指定しなければいけないため、Microsoft.Deployment.WindowsInstaller.dll も追加しています。
Chain 要素にインストーラパッケージを詰め込みます。
ここではインストーラに必要な .NET Framework のインストーラと、本来の目的である Installer.msi ファイルを登録しています。
.NET Framework のインストーラは、条件によってはインストールする必要がないため、 PackageGroupRef 要素を使って ExePackage を参照させることで条件を付加しています。
その条件とは、Windows Vista 以降か、または .NET Framework 4.0 以降がインストール済みかどうか、をレジストリを探索することで確認しています。
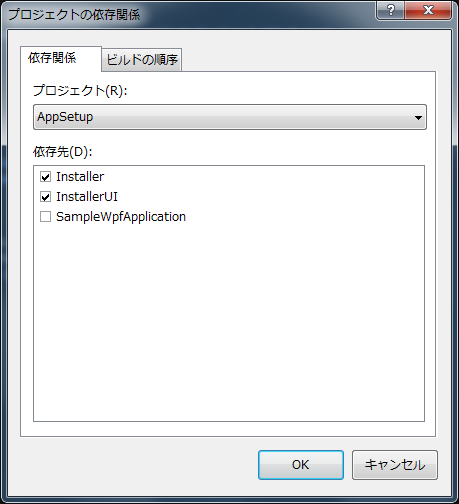
それではビルドしてみましょう。プロジェクトの依存関係を適切に設定しておくことで、ビルド順序を自動的に判別して各プロジェクトをビルドしてくれるので、必ず設定しておきましょう。
すると exe ファイルが生成されます。
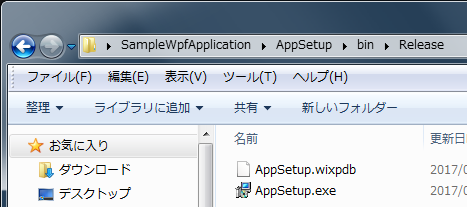
それでは早速 exe ファイルを実行してみましょう。
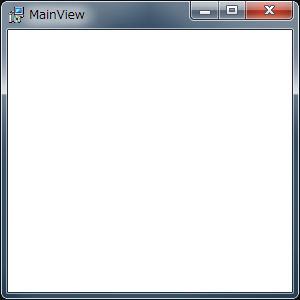
MainView ウィンドウが表示されれば成功です。
.NET Framework 4.0 以降がインストールされていない PC で実行すると、まず .NET Framework 4.0 のインストーラが起動するはずです。
ちょっと冒頭のイメージ図で状況を整理しておきましょう。
WiX の Bootstrapper Project は本来インストールさせたい SampleWpfApplication という WPF アプリケーションのインストーラパッケージである msi ファイルと、そのインストーラの UI として使用する WPF カスタムコントロールライブラリの dll を持っています。また、インストーラが必要とする .NET Framework のインストーラも持っています。
実際のインストール処理は元々の msi ファイルがおこないますが、そのキックをかけるのは BootstrapperApplication クラスを持つカスタム UI になります。
したがって、今後はカスタム UI を編集していくことで、インストーラを作り上げていくことになります。
これでいよいよ好きな UI でインストーラを作成することができるようになってきました。
次回はここで作成した MainView ウィンドウでインストール/アンインストールを実行できるようにカスタマイズしていきます。
Tweet
|
<< 古い記事へ |
新しい記事へ >> |